文接上篇 利用阿里云免费ca证书给网站申请ssl加密,全站启用https://
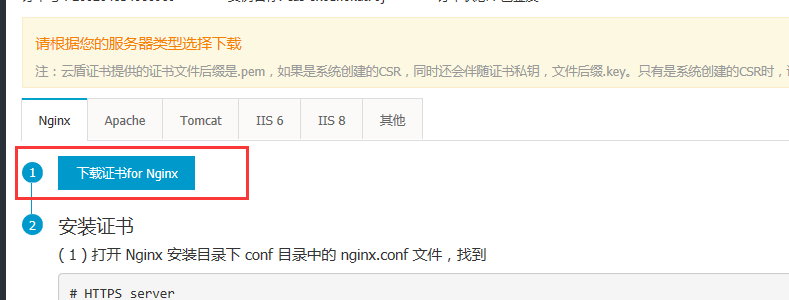
等待申请的证书签发之后,我们点击下载证书
![]()
根据服务器环境下载文件

解压后改名(方便输入,不改也可以)
![]()
![]()
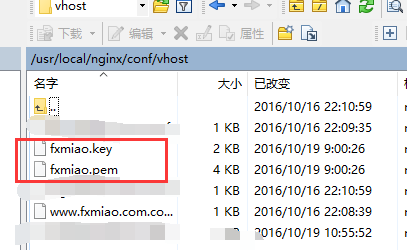
上传到服务器,目录可以自行设置
比如我放在nginx安装目录的vhost处

现在我们需要编辑的就是网站的配置文件,也就是上图的domain.conf文件
这个是默认的:
server
{
listen 80;
#listen [::]:80;
server_name www.fxmiao.net fxmiao.net;
index index.html index.htm index.php default.html default.htm default.php;
root /home/wwwroot/www.fxmiao.net;
include emlog.conf;
#error_page 404 /404.html;
include enable-php.conf;
location ~ .*.(gif|jpg|jpeg|png|bmp|swf)$
{
expires 30d;
}
location ~ .*.(js|css)?$
{
expires 12h;
}
location ~ /.
{
deny all;
}
access_log /home/wwwlogs/www.fxmiao.net.log;
}
①修改为https(替换文件内全部内容):
server
{
listen 443 ssl; //如果需要spdy也可以加上,lnmp1.2及其后版本都默认支持spdy,lnmp1.3 nginx 1.9.5以上版本默认支持http2
server_name www.fxmiao.net fxmiao.net; //这里是你的域名
index index.html index.htm index.php default.html default.htm default.php;
root /home/wwwroot/www.fxmiao.net; //网站目录
ssl_certificate /usr/local/nginx/conf/vhost/fxmiao.pem; //前面生成的证书,根据自己的情况修改路径和文件名
ssl_certificate_key /usr/local/nginx/conf/vhost/fxmiao.key; //前面生成的密钥,同上
ssl_ciphers "EECDH+CHACHA20:EECDH+CHACHA20-draft:EECDH+AES128:RSA+AES128:EECDH+AES256:RSA+AES256:EECDH+3DES:RSA+3DES:!MD5";
ssl_protocols TLSv1 TLSv1.1 TLSv1.2;
ssl_prefer_server_ciphers on;
ssl_session_cache shared:SSL:10m;
include emlog.conf;//这个是伪静态根据自己的需求改成其他或删除
#error_page 404 /404.html;
location ~ [^/].php(/|$)
{
# comment try_files $uri =404; to enable pathinfo
try_files $uri =404;
fastcgi_pass unix:/tmp/php-cgi.sock;
fastcgi_index index.php;
include fastcgi.conf; //lnmp 1.0及之前版本替换为include fcgi.conf;
#include pathinfo.conf;
}
location ~ .*.(gif|jpg|jpeg|png|bmp|swf)$
{
expires 30d;
}
location ~ .*.(js|css)?$
{
expires 12h;
}
access_log off;
}
添加完需要执行:/etc/init.d/nginx reload 重新载入配置使其生效。
②同时监听80(http)和443(https)端口:
server
{
listen 80;
listen 443 ssl;
#listen [::]:80;
server_name www.fxmiao.net fxmiao.net;
index index.html index.htm index.php default.html default.htm default.php;
root /home/wwwroot/www.fxmiao.net;
ssl_certificate /usr/local/nginx/conf/vhost/fxmiao.pem;
ssl_certificate_key /usr/local/nginx/conf/vhost/fxmiao.key;
ssl_ciphers "EECDH+CHACHA20:EECDH+CHACHA20-draft:EECDH+AES128:RSA+AES128:EECDH+AES256:RSA+AES256:EECDH+3DES:RSA+3DES:!MD5";
ssl_protocols TLSv1 TLSv1.1 TLSv1.2;
ssl_prefer_server_ciphers on;
ssl_session_cache shared:SSL:10m;
include emlog.conf;
#error_page 404 /404.html;
location ~ [^/].php(/|$)
{
# comment try_files $uri =404; to enable pathinfo
try_files $uri =404;
fastcgi_pass unix:/tmp/php-cgi.sock;
fastcgi_index index.php;
include fastcgi.conf;
#include pathinfo.conf;
}
location ~ .*.(gif|jpg|jpeg|png|bmp|swf)$
{
expires 30d;
}
location ~ .*.(js|css)?$
{
expires 12h;
}
access_log off;
}
添加完需要执行:/etc/init.d/nginx reload 重新载入配置使其生效。
③80跳转443(http自动跳转https)【下面的方式在lnmp1.4中测试有效】
nginx下301 http跳到https的配置:
(将以下代码后复制到①配置文件的最后面,域名改成自己的)
server
{
listen 80;
server_name www.vpser.net ;
return 301 https://www.vpser.net$request_uri;
}
添加完需要执行:/etc/init.d/nginx reload 重新载入配置使其生效。
教程到此结束,如果大家在此过程中遇到问题可以给我留言,但也请大家多多主动思考,勿做伸手党!
参考来源:https://www.vpser.net/build/letsencrypt-free-ssl.html
 分享喵
分享喵
Warning: A non-numeric value encountered in /www/wwwroot/www.fxmiao.net/wp-content/themes/dux/modules/mo_comments_list.php on line 26
@Aspect:接口也改成https就可以了,我的就是正常的
Warning: A non-numeric value encountered in /www/wwwroot/www.fxmiao.net/wp-content/themes/dux/modules/mo_comments_list.php on line 26
开启https后大前端获取qq信息函数用不了,接口不支持https。